

I suppose I could put some music up in front of me and just play something, but I prefer to work on something that really gets me inspired. Maybe something I have heard on the radio, or something I have heard another Member play. And recently, for the November Challenge, Jon D has played Louis Armstrong's "What a wonderful world". This reminded me of when I had first heard this song, and I thought then that it had some wonderful harmonies in it.
So first, to listen to how this tune had been recorded originally. Then I could maybe get some idea as to what sort of backing (Style) to have. With you keyboard players, you probably have a Style ready and waiting for you to jump straight in and play it. But not with the AR. We do have Styles, but they are somewhat limited, and in this Topic I want to show you how I go about creating a suitable Style for me to play it on my AR.
Here's the original that came out as a 45rpm single. Nearly 80 thousand views, so it must be good!
Louis Armstrong - What A Wonderful World (Lyrics)
Listening to this, I can hear an arpeggio in the background running right through it. If I want a Style to suit this song it must have two basic ingredients: (a) it has to be in 6/8 time (which this is), and (b) it must have an arpeggio running in the background.
And then I found another version of this song. Still Louis Armstrong, but this time with him on stage with his band, and singling it with that wonderful smile that he has. If you listen to this, what do you hear? No arpeggios this time! What we have running right through is a 'repeating piano'. They didn't have that in the original version; and they don't have any arpeggios in this version.
Louis Armstrong - What a wonderful world ( 1967 )
So now I'm thinking I want to have a Style with (a) 6/8 timing, and (b) it must have a 'repeating piano' running in the background.
Now, off to go looking for a STYLE with both the arpeggio and the repeating piano.
Analysing a piece of music .. creating Style PARTS.
16 posts
• Page 1 of 1
Analysing a piece of music .. creating Style PARTS.
![]() by Hugh-AR » 03 Dec 2019 02:04
by Hugh-AR » 03 Dec 2019 02:04
It's all about the music ♫ ♪ ♫ Organ: Yamaha AR80 & Keyboard: Tyros 4
 ..
.. 
Challenge Winner
2021 May (Joint Winner); July; September
2022 July; August
2023 April; June; September
.. Challenge Winner
2021 May (Joint Winner); July; September
2022 July; August
2023 April; June; September
-

Hugh-AR - Prolific Poster
- Posts: 7210
- Joined: 07 Feb 2015 15:34
- Location: Weston-super-Mare, Somerset, UK
Re: Analysing a piece of music .. creating Style PARTS.
![]() by Hugh-AR » 11 Dec 2019 00:45
by Hugh-AR » 11 Dec 2019 00:45
So, not having any 'bespoke' Styles for What A Wonderful World (you keyboard players should be so lucky!) I will go through the default STYLES I have in my AR and see what I have got. Looking on Google for the Time Signature for this piece, it says:
Not to my way of thinking. Don't think so. I reckon a 6/8 Style will fit this song admirably. I have two altogether: 6/8 Ballad 1, and 6/8 Ballad 2 .. and each of these has two variations, a MAIN A and a MAIN B. I have sampled them with 6/8 Ballad 2 first (Variation A, then Variation B); and then 6/8 Ballad 1 (Variation A, then Variation B). What we are looking for is a STYLE that will be suitable to use for this piece.
Listen to these Styles 'as is' by clicking on the below:
Click the back-button afterwards to get back to this page.
DEMO of 6/8 Ballad 2 & 6/8 Ballad 1.. in that order; MAIN A, then MAIN B for each one
Are there any there you fancy using to play What A Wonderful World? Not as far as I am concerned. Nothing remotely follows the patterns I am looking for. They all have the right 'beat' to play the song, so I could just sit down and play it to fit. But there's no way that would satisfy me as the backing PARTS are not what I was hoping to hear.
In the end, I am opting for the last one in that DEMO .. 6/8 Ballad 1 Variation B .. and will see what I can do with it.
The time signature is 4:4 time therefore the count in each bar is |1 2 3 4| or |1& 2& 3& 4& | where 1 beat in this case is 1&, etc.
Not to my way of thinking. Don't think so. I reckon a 6/8 Style will fit this song admirably. I have two altogether: 6/8 Ballad 1, and 6/8 Ballad 2 .. and each of these has two variations, a MAIN A and a MAIN B. I have sampled them with 6/8 Ballad 2 first (Variation A, then Variation B); and then 6/8 Ballad 1 (Variation A, then Variation B). What we are looking for is a STYLE that will be suitable to use for this piece.
Listen to these Styles 'as is' by clicking on the below:
Click the back-button afterwards to get back to this page.
DEMO of 6/8 Ballad 2 & 6/8 Ballad 1.. in that order; MAIN A, then MAIN B for each one
Are there any there you fancy using to play What A Wonderful World? Not as far as I am concerned. Nothing remotely follows the patterns I am looking for. They all have the right 'beat' to play the song, so I could just sit down and play it to fit. But there's no way that would satisfy me as the backing PARTS are not what I was hoping to hear.
In the end, I am opting for the last one in that DEMO .. 6/8 Ballad 1 Variation B .. and will see what I can do with it.
It's all about the music ♫ ♪ ♫ Organ: Yamaha AR80 & Keyboard: Tyros 4
..
Challenge Winner
2021 May (Joint Winner); July; September
2022 July; August
2023 April; June; September
.. Challenge Winner
2021 May (Joint Winner); July; September
2022 July; August
2023 April; June; September
-
Hugh-AR - Prolific Poster
- Posts: 7210
- Joined: 07 Feb 2015 15:34
- Location: Weston-super-Mare, Somerset, UK
Re: Analysing a piece of music .. creating Style PARTS.
![]() by Hugh-AR » 12 Dec 2019 12:29
by Hugh-AR » 12 Dec 2019 12:29
First, I get 6/8 Ballad 1 Variation B up on the screen. The PARTS of the STYLE show, and are named:
RHYTHM 1, RHYTHM 2. BASS, CHORD 1, CHORD 2, PAD, PHRASE 1, PHRASE 2.
Apart from the two Rhythm ones and the Bass one, there is no real significance in the other names apart from giving you an indication of what type of backing may be in each slot. If you are creating a PART yourself you can actually put any type of backing in any of those slots.
So for 6/8 Ballad 1 Variation B I'll have a listen as to what is actually in each PART.
You can turn each PART ON or OFF by pressing the corresponding Data Control Button under the screen. Being able to do this means that you have control over which backing PARTS you want to have in the piece you are playing. This is not true of all organs and keyboards .. although it is with all Yamaha keyboards. With the Roland organ (apart from the last one) it's all the STYLE or none. If you have a Roland please correct me if I'm wrong.
So in this DEMO below I have switched the Rhythm to OFF, played an F chord, and you hear the BASS Part (on it's own); followed by CHORD 1 (on it's own); then CHORD 2 (on it's own); and finally CHORD 1 and CHORD 2 together. There are no other 'Parts' in this Style.
Click on the below to listen; then click the back-button afterwards to get back to this page.
DEMO of BASS; then CHORD 1; then CHORD 2; and finally CHORD 1 and CHORD 2 together
Just out of interest, you can hear voices being 'panned' to both the left and the right (particularly if you have headphones on). This is what gives the 'fullness' to the backing.
It's all about the music ♫ ♪ ♫ Organ: Yamaha AR80 & Keyboard: Tyros 4
..
Challenge Winner
2021 May (Joint Winner); July; September
2022 July; August
2023 April; June; September
.. Challenge Winner
2021 May (Joint Winner); July; September
2022 July; August
2023 April; June; September
-
Hugh-AR - Prolific Poster
- Posts: 7210
- Joined: 07 Feb 2015 15:34
- Location: Weston-super-Mare, Somerset, UK
Re: Analysing a piece of music .. creating Style PARTS.
![]() by Hugh-AR » 16 Dec 2019 00:23
by Hugh-AR » 16 Dec 2019 00:23
The AR is an organ where you can create your own STYLE PARTS, and that is what I am about to do in this Topic. You can do this in all Yamaha keyboards too, but then when you have 2,500 or more STYLES to choose from, and can even purchase 'bespoke' STYLES for a particular song, who would want to do this?
And the answer to that is people like me, because I can guarantee that none of the Styles on offer are going to be exactly what I am looking for in a backing. How likely is it that someone else will have produced something that I have in my head?
OK. So I have listened to the PARTS in the Style I have chosen, Style 6/8 Ballad 1 Variation B. I'll approach this by looking at one PART at a time and deciding what I can do with it. But maybe first, I should explain how you get at the STYLE in order to make changes to it.
The explanation below is specific to the AR organ, but the principle behind what I am going to say is the same for all Yamaha keyboards. Same ideas but a different way of doing it.
First, get the STYLE you are wanting to work with up on the screen. So I have pressed the Tab in the STYLE section that says BALLAD:
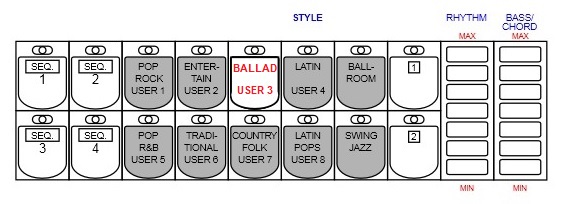
.. and have chosen 6/8 Ballad 1 by pressing the top right Data Control Button under the screen.

This STYLE is now showing on the screen, with it's name at the top. At this point I don't choose a MAIN A or MAIN B as this comes later.
The Program (App?) for handling STYLES is called ACCOMPANIMENT PROGRAM (ACCOMP. PROGRAM for short) and this button is on the right of the screen.
Having got the Style you want showing, we now have to 'load' it into ACCOMP. PROGRAM.
Press and HOLD the ACCOMP. PROGRAM button, and whilst holding it down press the Style Tab BALLAD (ie. the one you set up to make adjustments to). Let both buttons go.
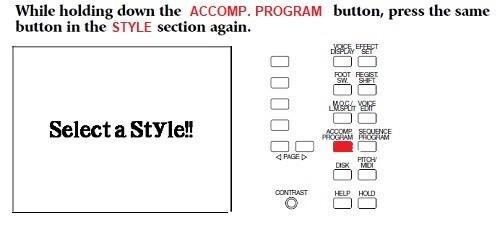
You will now have your STYLE up on the screen with the name at the top, but it will look different to what you had before as it now contains all the functions for adjusting the Style.
If you were to just press the ACCOMP. PROGRAM button and let go you will see this:

All the functions are there for you to do some adjustments to the Style, but it says No name at the top. You've just missed out on loading your STYLE into ACCOMP. PROGRAM!
Assuming that you've got Style 6/8 Ballad 1 showing at the top, note that the screen you are looking at is the BASIC screen. It's highlighted top right. This is the 'default' screen when you load your Style in. Now, if you remember, the Style Variation I was wanting to use was MAIN B. I did say that this would be done later .. and now is the time to do it. Look at the screen and you will see MAIN A is highlighted. This is the 'default'. By pressing the appropriate Data Control Button under the screen move the highlight down to MAIN B.
We can now take a serious look at all those PARTS. We have already listened to these 'individually' so the next step is to hear them individually again, but from ACCOMP. PROGRAM this time.
We are in the wrong screen for doing this. Press the button next to RECORD and you will see this (but with your Style Name showing at the top, not No name):
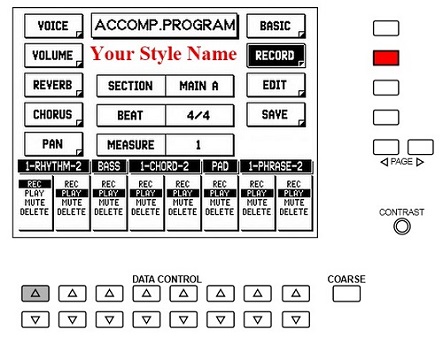
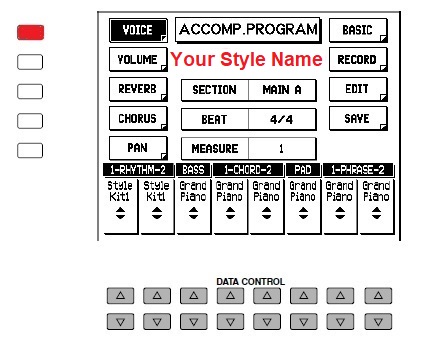
You will see each of the PARTS running across the screen (RHYTHM 1 & 2; BASS; CHORD 1 & 2; PAD; PHRASE 1 & 2). And using the Data Control Buttons under the screen we can switch each one between RECORD; PLAY; MUTE; and DELETE.
So move all the PARTS to MUTE. Now, one at a time, move the highlight to PLAY (with all the other ones on MUTE).
To hear what is in these PARTS press the START on the left.
I'll say that again, press the START on the left.
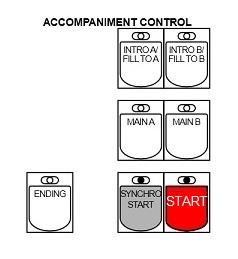
The notes you hear will go through the 'measure' and then repeat themselves. To stop it playing, press the START again.
I'll say that again. To stop it playing, press the START again. Then move the one you were listening to back to MUTE and get another of the Parts to PLAY.
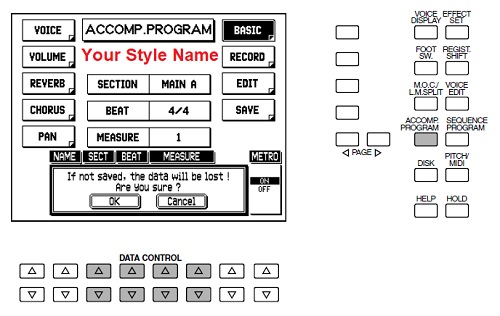
To end your session, just press the ACCOMP. PROGRAM button again. If you had made some changes you will see a message warning "If not SAVED the data will be lost. Are you sure?" with options OK or Cancel. Click OK to leave the program without changes. But we haven't made any changes, so you won't see this message and will just leave the programme.
And the answer to that is people like me, because I can guarantee that none of the Styles on offer are going to be exactly what I am looking for in a backing. How likely is it that someone else will have produced something that I have in my head?
OK. So I have listened to the PARTS in the Style I have chosen, Style 6/8 Ballad 1 Variation B. I'll approach this by looking at one PART at a time and deciding what I can do with it. But maybe first, I should explain how you get at the STYLE in order to make changes to it.
The explanation below is specific to the AR organ, but the principle behind what I am going to say is the same for all Yamaha keyboards. Same ideas but a different way of doing it.
First, get the STYLE you are wanting to work with up on the screen. So I have pressed the Tab in the STYLE section that says BALLAD:
.. and have chosen 6/8 Ballad 1 by pressing the top right Data Control Button under the screen.
This STYLE is now showing on the screen, with it's name at the top. At this point I don't choose a MAIN A or MAIN B as this comes later.
The Program (App?) for handling STYLES is called ACCOMPANIMENT PROGRAM (ACCOMP. PROGRAM for short) and this button is on the right of the screen.
Having got the Style you want showing, we now have to 'load' it into ACCOMP. PROGRAM.
Press and HOLD the ACCOMP. PROGRAM button, and whilst holding it down press the Style Tab BALLAD (ie. the one you set up to make adjustments to). Let both buttons go.
You will now have your STYLE up on the screen with the name at the top, but it will look different to what you had before as it now contains all the functions for adjusting the Style.
If you were to just press the ACCOMP. PROGRAM button and let go you will see this:
All the functions are there for you to do some adjustments to the Style, but it says No name at the top. You've just missed out on loading your STYLE into ACCOMP. PROGRAM!
Assuming that you've got Style 6/8 Ballad 1 showing at the top, note that the screen you are looking at is the BASIC screen. It's highlighted top right. This is the 'default' screen when you load your Style in. Now, if you remember, the Style Variation I was wanting to use was MAIN B. I did say that this would be done later .. and now is the time to do it. Look at the screen and you will see MAIN A is highlighted. This is the 'default'. By pressing the appropriate Data Control Button under the screen move the highlight down to MAIN B.
We can now take a serious look at all those PARTS. We have already listened to these 'individually' so the next step is to hear them individually again, but from ACCOMP. PROGRAM this time.
We are in the wrong screen for doing this. Press the button next to RECORD and you will see this (but with your Style Name showing at the top, not No name):
You will see each of the PARTS running across the screen (RHYTHM 1 & 2; BASS; CHORD 1 & 2; PAD; PHRASE 1 & 2). And using the Data Control Buttons under the screen we can switch each one between RECORD; PLAY; MUTE; and DELETE.
So move all the PARTS to MUTE. Now, one at a time, move the highlight to PLAY (with all the other ones on MUTE).
To hear what is in these PARTS press the START on the left.
I'll say that again, press the START on the left.
The notes you hear will go through the 'measure' and then repeat themselves. To stop it playing, press the START again.
I'll say that again. To stop it playing, press the START again. Then move the one you were listening to back to MUTE and get another of the Parts to PLAY.
To end your session, just press the ACCOMP. PROGRAM button again. If you had made some changes you will see a message warning "If not SAVED the data will be lost. Are you sure?" with options OK or Cancel. Click OK to leave the program without changes. But we haven't made any changes, so you won't see this message and will just leave the programme.
It's all about the music ♫ ♪ ♫ Organ: Yamaha AR80 & Keyboard: Tyros 4
..
Challenge Winner
2021 May (Joint Winner); July; September
2022 July; August
2023 April; June; September
.. Challenge Winner
2021 May (Joint Winner); July; September
2022 July; August
2023 April; June; September
-
Hugh-AR - Prolific Poster
- Posts: 7210
- Joined: 07 Feb 2015 15:34
- Location: Weston-super-Mare, Somerset, UK
Re: Analysing a piece of music .. creating Style PARTS.
![]() by Hugh-AR » 16 Dec 2019 12:14
by Hugh-AR » 16 Dec 2019 12:14
Please Note: The START acts like an ON/OFF toggles switch. Don't use the SYNCHRO START at all when in ACCOMP. PROGRAM. This would involve having to 'play a note' to get it going .. and playing a note would RECORD it (if one of those PARTS is set to REC). And when you load a Style into ACCOMP. PROGRAM the 'default' is set up to REC RHYTHM 1 .. so don't touch any of the notes or you may get extra drums you weren't expecting playing in your Rhythm!
I have put up the explanation above so you can actually get to see all the functions available to you in ACCOMP. PROGRAM, and familiarize yourselves with the process of loading a STYLE in. I will endeavour to explain how to use each of these functions to 'adjust' a Style as this Topic progresses.
I have put up the explanation above so you can actually get to see all the functions available to you in ACCOMP. PROGRAM, and familiarize yourselves with the process of loading a STYLE in. I will endeavour to explain how to use each of these functions to 'adjust' a Style as this Topic progresses.
It's all about the music ♫ ♪ ♫ Organ: Yamaha AR80 & Keyboard: Tyros 4
..
Challenge Winner
2021 May (Joint Winner); July; September
2022 July; August
2023 April; June; September
.. Challenge Winner
2021 May (Joint Winner); July; September
2022 July; August
2023 April; June; September
-
Hugh-AR - Prolific Poster
- Posts: 7210
- Joined: 07 Feb 2015 15:34
- Location: Weston-super-Mare, Somerset, UK
Re: Analysing a piece of music .. creating Style PARTS.
![]() by Hugh-AR » 16 Dec 2019 19:31
by Hugh-AR » 16 Dec 2019 19:31
Back to creating a STYLE for What A Wonderful World. Or I should say, 'adjusting' a Style, as starting from scratch would involve putting in a drum rhythm to get it going. I am not a drummer and I wouldn't have a clue what type of drum to hit, or when. I shall now take a look at each of those PARTS in turn in Style 6/8 Ballad 1 Variation B. In case you have forgotten what is in each PART, here is the DEMO I did again.
In the DEMO I had switched the Rhythm to OFF, played an F chord, and you hear the BASS Part (on it's own); followed by CHORD 1 (on it's own); then CHORD 2 (on it's own); and finally CHORD 1 and CHORD 2 together. There are no other 'Parts' in this Style.
Click on the below to listen; then click the back-button afterwards to get back to this page.
DEMO of BASS; then CHORD 1; then CHORD 2; and finally CHORD 1 and CHORD 2 together
Now to look at each PART in turn.
BASS PART
Here is the BASS PART again. This what the STYLE plays, looping round again and again for the length of the 'measure'. What you have to note is (a) the 'pattern' the notes follow, and (b) bear in mind that everything you hear is done in the key of C.
Of course when you are actually using the STYLE the chord you hear is the one you are playing with your left hand eg. C, or F, or G .. and the 'pattern' is the same as in the DEMO, but the notes are based on the chord you are actually playing ie. based on C as the root; or F; or G etc.
The original BASS PART .. no chords, of course, just the 'pattern' the bass is following. And I have repeated it, so you hear it twice.
Click on the below to listen; then click the back-button afterwards to get back to this page.
The 'pattern' the Bass is following
Perhaps this is a good place to point that when adjusting a STYLE you have to have a pretty good idea in your head as to what you want to hear in your STYLE. This is where 'playing by ear' is paramount. You can't follow written sheet music to do what I am about to do.
With that BASS PART I have two issues.
1. For this song I don't like the VOICE chosen (by Yamaha). To 'plucky'. I prefer a more 'rounded' and 'deeper' Bass Voice.
2. For this song I don't like the 'pattern' the bass player is following. It's much too 'busy' and doesn't blend in with the tune.
Here's an example of a STYLE played on a Genos keyboard by George (George). Something a bit like this would fit in better with the tune. I know it's not 6/8 time, but just listen to the nice deep bass, and the 'pattern' the bass is following. This is a good example of KISS. Keep It Simple See.
Click on the below to listen; then click the back-button afterwards to get back to this page.
DEMO of a STYLE from a Genos keyboard.
That's a great Bass Pattern! I shall remember that for using in another AR Style.
So what do I have in my head for the bass part? Click on the below to find out. First is the original Bass pattern with the 'Yamaha' Voice; and this is followed by my choice of Bass Voice and my 'pattern' for the bass .. and then I have repeated it.
Click on the below to listen; then click the back-button afterwards to get back to this page.
The original voice and pattern; followed by my choice of voice and my pattern.
In my next post I'll explain how I did this in ACCOMP. PROGRAM.
It's all about the music ♫ ♪ ♫ Organ: Yamaha AR80 & Keyboard: Tyros 4
..
Challenge Winner
2021 May (Joint Winner); July; September
2022 July; August
2023 April; June; September
.. Challenge Winner
2021 May (Joint Winner); July; September
2022 July; August
2023 April; June; September
-
Hugh-AR - Prolific Poster
- Posts: 7210
- Joined: 07 Feb 2015 15:34
- Location: Weston-super-Mare, Somerset, UK
Re: Analysing a piece of music .. creating Style PARTS.
![]() by Hugh-AR » 26 Dec 2019 11:25
by Hugh-AR » 26 Dec 2019 11:25
Continuing with "Creating Style PARTS" ...
The first thing I had said when listening to the Bass PART of the original Style 6/8 Ballad 1 Variation B was that I preferred a 'deeper' sounding Bass. OK. We'll change the VOICE for this PART to my preferred voice before we start changing/recording any PARTS.
If you have an AR, carry out the following steps (these are the same as the ones in my earlier post):
1. Get the STYLE you want up on the screen. In this case 6/8 Ballad 1 Variation B from BALLAD.
2. Press and hold the ACCOMP. PROGRAM button and press the BALLAD button in the STYLE section again. Release both buttons.
3. You will be in the BASIC screen in ACCOMP. PROGRAM. By pressing the appropriate Data Control Button under the screen, move the highlight down from MAIN A to MAIN B.
4. Press the button by RECORD. By pressing the appropriate Data Control Buttons under the screen, put RHYTHM 1 and 2 onto PLAY; BASS onto PLAY; and all the others on MUTE. Remember that the START tab on the left is an ON/OFF' toggle switch'. So if you like, you can press the START now to hear the existing Bass PART. Press START again to stop it.
5. Press the button on the left of the screen next to VOICE. The Voices Yamaha have chosen for this Style show across the bottom .. but not all Grand Piano as they are showing in this diagram!
The one chosen for the BASS in 6/8 Ballad 1 Variation B is Fingered Bass. By pressing the appropriate Data Control Button under the screen, move this UP one slot. Acoustic Bass will now be showing.
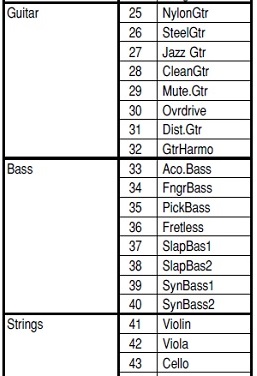
How do you know what VOICES are available for you to choose from? Well, there are 128 altogether, and these are listed on Page 125 of the USER MANUAL .. so you'll have to go and check them out! Here are just a few of them in the Guitar and Bass sections:
If you like, you can press the START tab to hear what it sounds like with this change of Voice .. and press START again to stop it.
Please Note: Whatever VOICE you choose for a PART, it will be the same for both MAIN A and MAIN B. You can't have one VOICE for a PART in MAIN A and a different one in MAIN B.
Next .. I want to change the 'pattern' of that Bass PART to something not as 'busy, and more in keeping with the song I am playing. So we now need to get the RECORD screen up again. It's as we left it, with the RHYTHM and BASS Parts 'playing', and all the others on Mute. I always keep Rhythm 1 and Rhythm 2 on PLAY as you have to have a 'beat' going to play your 'pattern' to.
To change the 'pattern' in a PART you first have to DELETE that PART so the slot is empty. So by using the appropriate Data Control Buttons under the screen, select DELETE, and confirm with OK. We are now ready to record a new pattern for the Bass.
Well, not quite ready, as when we record our new 'pattern' we don't want to hear any other 'voices' playing with notes we press. We just want to hear that Acoustic Bass.
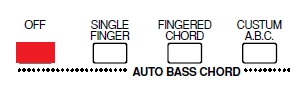
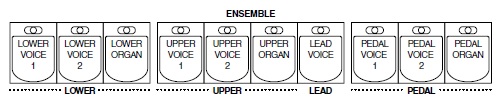
1. Make sure that the AUTO - BASS - CHORD is OFF.
2. Make sure no 'voices' are routed through to the keys ie. All lights in ENSEMBLE are OFF.
Now we are ready to record that 'pattern'.
Press that START .. which remember is a 'toggle switch', so we press it again when we want to STOP.
IMPORTANT: Look at the TEMPO/BAR BEAT indicator to the left of the main screen. This performs several tasks.
1. It tells you the TEMPO of the Rhythm you are about to play. You can increase or decrease the TEMPO by pressing th UP and DOWN buttons on either side. And by the way, if you didn't already know this, pressing those two buttons together will give you the 'default' Tempo Yamaha have given that particular Rhythm.
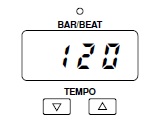
2. It 'counts' where you are in the song you are playing. The first number is the bar you have got to, and the second which beat in the bar you have got to.
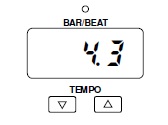
3. And this time it will count through the 'measure' of the 'pattern'. So that first number progresses upwards as it goes through the 'measure' .. and then it goes back to 1 again and repeats itself. So watch it counting through the bars for a bit (while you compose yourself), and when you're ready, play that Bass PART for the length of the measure. Start playing the pattern at 1.1 and when it comes round to the 1.1 again don't play anything on that beat or you will get a 'double whammy' on that first beat. See below for which notes to play for the 'pattern'.
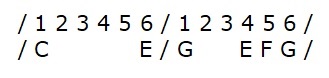
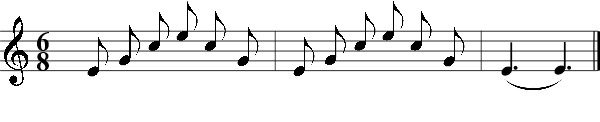
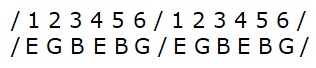
Note: All 'patterns' have to be done in the key of C. In fact, I should say that you play notes 'in the harmony of C' as you have to pretend you are playing C harmony all the time you are recording. So for my Bass 'pattern' (which you have already listened to earlier) I am playing this:
Click the below to listen; then click the 'back-button' after to return to this page.
My Bass Part 'measure', repeated
My 'pattern' is 6/8 time, and as I play by ear I am quietly counting 1, 2, 3, 4, 5, 6 whilst playing the notes in the right place.
For those of you who read music, I asked PeterA to put my pattern into 'music notation', which he has done for me (below).

OK. So the 'pattern' is done? If you're not happy with it (I should think I would have about 5 goes at something like this before I am happy with it) you can always go to DELETE, confirm with an OK .. and then try again.
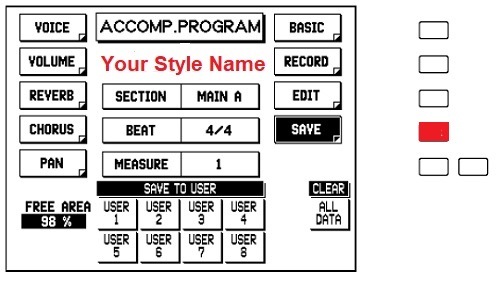
When we're happy with it we have to SAVE it. You SAVE it to a USER number. There is one more thing you could do before saving it, and that is to change the Style's NAME. Otherwise when you use it you don't really know whether it's your Style or the original.
Go to the BASIC screen and you will see INPUT NAME, bottom left.
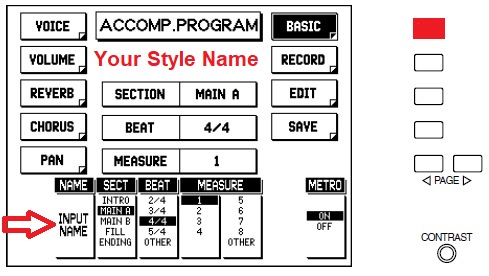
Using the Data Control Buttons under the screen you re-name your Style in the usual way.
If you wanted to SAVE your work you would go to the SAVE screen, SAVE it to eg. USER 1, and confirm with OK.
But more on this later as we haven't finished yet! We have only done one PART .. the BASS. And we still have to do the 'Arpeggio' PART and the 'Repeating Piano' PART.
But I will finish this post by saying one thing (which you may be worried about). The 'default' STYLES in the section on the left remain 'as is' at all times. Nothing you do by playing about with the Style will affect the original. Think of it like this. The original is copied into ACCOMP. PROGRAM, and appears on the screen. You make changes to it. This is then SAVED to a USER slot, where you can access it. Nothing is 'permanent' about a USER slot. If you load in another floppy disk it will replace those USER slots with what's on the floppy disk. So when we have finished making the changes to this STYLE we should SAVE it to a floppy disk track.
The first thing I had said when listening to the Bass PART of the original Style 6/8 Ballad 1 Variation B was that I preferred a 'deeper' sounding Bass. OK. We'll change the VOICE for this PART to my preferred voice before we start changing/recording any PARTS.
If you have an AR, carry out the following steps (these are the same as the ones in my earlier post):
1. Get the STYLE you want up on the screen. In this case 6/8 Ballad 1 Variation B from BALLAD.
2. Press and hold the ACCOMP. PROGRAM button and press the BALLAD button in the STYLE section again. Release both buttons.
3. You will be in the BASIC screen in ACCOMP. PROGRAM. By pressing the appropriate Data Control Button under the screen, move the highlight down from MAIN A to MAIN B.
4. Press the button by RECORD. By pressing the appropriate Data Control Buttons under the screen, put RHYTHM 1 and 2 onto PLAY; BASS onto PLAY; and all the others on MUTE. Remember that the START tab on the left is an ON/OFF' toggle switch'. So if you like, you can press the START now to hear the existing Bass PART. Press START again to stop it.
5. Press the button on the left of the screen next to VOICE. The Voices Yamaha have chosen for this Style show across the bottom .. but not all Grand Piano as they are showing in this diagram!
The one chosen for the BASS in 6/8 Ballad 1 Variation B is Fingered Bass. By pressing the appropriate Data Control Button under the screen, move this UP one slot. Acoustic Bass will now be showing.
How do you know what VOICES are available for you to choose from? Well, there are 128 altogether, and these are listed on Page 125 of the USER MANUAL .. so you'll have to go and check them out! Here are just a few of them in the Guitar and Bass sections:
If you like, you can press the START tab to hear what it sounds like with this change of Voice .. and press START again to stop it.
Please Note: Whatever VOICE you choose for a PART, it will be the same for both MAIN A and MAIN B. You can't have one VOICE for a PART in MAIN A and a different one in MAIN B.
Next .. I want to change the 'pattern' of that Bass PART to something not as 'busy, and more in keeping with the song I am playing. So we now need to get the RECORD screen up again. It's as we left it, with the RHYTHM and BASS Parts 'playing', and all the others on Mute. I always keep Rhythm 1 and Rhythm 2 on PLAY as you have to have a 'beat' going to play your 'pattern' to.
To change the 'pattern' in a PART you first have to DELETE that PART so the slot is empty. So by using the appropriate Data Control Buttons under the screen, select DELETE, and confirm with OK. We are now ready to record a new pattern for the Bass.
Well, not quite ready, as when we record our new 'pattern' we don't want to hear any other 'voices' playing with notes we press. We just want to hear that Acoustic Bass.
1. Make sure that the AUTO - BASS - CHORD is OFF.
2. Make sure no 'voices' are routed through to the keys ie. All lights in ENSEMBLE are OFF.
Now we are ready to record that 'pattern'.
Press that START .. which remember is a 'toggle switch', so we press it again when we want to STOP.
IMPORTANT: Look at the TEMPO/BAR BEAT indicator to the left of the main screen. This performs several tasks.
1. It tells you the TEMPO of the Rhythm you are about to play. You can increase or decrease the TEMPO by pressing th UP and DOWN buttons on either side. And by the way, if you didn't already know this, pressing those two buttons together will give you the 'default' Tempo Yamaha have given that particular Rhythm.
2. It 'counts' where you are in the song you are playing. The first number is the bar you have got to, and the second which beat in the bar you have got to.
3. And this time it will count through the 'measure' of the 'pattern'. So that first number progresses upwards as it goes through the 'measure' .. and then it goes back to 1 again and repeats itself. So watch it counting through the bars for a bit (while you compose yourself), and when you're ready, play that Bass PART for the length of the measure. Start playing the pattern at 1.1 and when it comes round to the 1.1 again don't play anything on that beat or you will get a 'double whammy' on that first beat. See below for which notes to play for the 'pattern'.
Note: All 'patterns' have to be done in the key of C. In fact, I should say that you play notes 'in the harmony of C' as you have to pretend you are playing C harmony all the time you are recording. So for my Bass 'pattern' (which you have already listened to earlier) I am playing this:
Click the below to listen; then click the 'back-button' after to return to this page.
My Bass Part 'measure', repeated
My 'pattern' is 6/8 time, and as I play by ear I am quietly counting 1, 2, 3, 4, 5, 6 whilst playing the notes in the right place.
For those of you who read music, I asked PeterA to put my pattern into 'music notation', which he has done for me (below).
OK. So the 'pattern' is done? If you're not happy with it (I should think I would have about 5 goes at something like this before I am happy with it) you can always go to DELETE, confirm with an OK .. and then try again.
When we're happy with it we have to SAVE it. You SAVE it to a USER number. There is one more thing you could do before saving it, and that is to change the Style's NAME. Otherwise when you use it you don't really know whether it's your Style or the original.
Go to the BASIC screen and you will see INPUT NAME, bottom left.
Using the Data Control Buttons under the screen you re-name your Style in the usual way.
If you wanted to SAVE your work you would go to the SAVE screen, SAVE it to eg. USER 1, and confirm with OK.
But more on this later as we haven't finished yet! We have only done one PART .. the BASS. And we still have to do the 'Arpeggio' PART and the 'Repeating Piano' PART.
But I will finish this post by saying one thing (which you may be worried about). The 'default' STYLES in the section on the left remain 'as is' at all times. Nothing you do by playing about with the Style will affect the original. Think of it like this. The original is copied into ACCOMP. PROGRAM, and appears on the screen. You make changes to it. This is then SAVED to a USER slot, where you can access it. Nothing is 'permanent' about a USER slot. If you load in another floppy disk it will replace those USER slots with what's on the floppy disk. So when we have finished making the changes to this STYLE we should SAVE it to a floppy disk track.
It's all about the music ♫ ♪ ♫ Organ: Yamaha AR80 & Keyboard: Tyros 4
..
Challenge Winner
2021 May (Joint Winner); July; September
2022 July; August
2023 April; June; September
.. Challenge Winner
2021 May (Joint Winner); July; September
2022 July; August
2023 April; June; September
-
Hugh-AR - Prolific Poster
- Posts: 7210
- Joined: 07 Feb 2015 15:34
- Location: Weston-super-Mare, Somerset, UK
Re: Analysing a piece of music .. creating Style PARTS.
![]() by Hugh-AR » 11 Jan 2020 18:31
by Hugh-AR » 11 Jan 2020 18:31
So what we now have is a 'new' STYLE based on the original 6/8 Ballad 1 Variation B. So far, only the Bass 'voice' and 'pattern of the bass part' have been changed.
Here is a DEMO of the original Style followed by the 'changed' Style .. which is then repeated so you can hear it again.
Click this LINK to listen, then press the back-button after to get back to this page.
DEMO of the original 6/8 Ballad 1, followed by the new one: Repeated.
Listening to this, we clearly haven't got an 'arpeggio' playing anywhere in the background .. so we have to put one in. But where? Remembering that we have to DELETE what is currently in one of those slots before we can put a new 'pattern' in, it would be best to choose one that hasn't got anything we may want to bring into play later.
I have opted to put my 'arpeggio' into PHRASE 2. I had said earlier that any PART can be put into any of those slots. The 'label' at the top only gives an indication of what type of pattern is probably in there. As an 'arpeggio' is a 'pattern' I reckon PHRASE 2 will be as good a place as any to put it.
First make sure that in the BASIC screen, MAIN B is highlighted (selected). I want to have a Grand Piano playing my arpeggio, so click the button by VOICE and by clicking the appropriate buttons under the screen in the PHRASE 2 column, change the Voice in PHRASE 2 to Grand Piano. We need to set a VOLUME too in the PHRASE 2 column. I reckon 21 will be about right, but we can always change it later if needs be. Then press the button by RECORD, and by pressing the appropriate button under the screen in the PHRASE 2 column .. DELETE Phrase 2.
We are now ready to RECORD our arpeggio. I will start the arpeggio on the E above middle C, and go up to top E .. and back down again. Listen to what I want in this DEMO.
Click this LINK to listen, then press the back-button after to get back to this page.
Arpeggio to put into PHRASE 2
Or as I have it my head, counting the beats in the bar ...
.. which PeterA has kindly converted to 'proper music' as this:
Now before we get carried away and actually play this arpeggio I have some news for you. We don't actually play these particular notes for the arpeggio as there is another thing we have to consider. Which requires a slight diversion for me to explain it. So I'll do this in my next post.
To be continued ...
It's all about the music ♫ ♪ ♫ Organ: Yamaha AR80 & Keyboard: Tyros 4
..
Challenge Winner
2021 May (Joint Winner); July; September
2022 July; August
2023 April; June; September
.. Challenge Winner
2021 May (Joint Winner); July; September
2022 July; August
2023 April; June; September
-
Hugh-AR - Prolific Poster
- Posts: 7210
- Joined: 07 Feb 2015 15:34
- Location: Weston-super-Mare, Somerset, UK
Re: Analysing a piece of music .. creating Style PARTS.
![]() by Hugh-AR » 12 Jan 2020 00:33
by Hugh-AR » 12 Jan 2020 00:33
Short diversion .. remembering that a short diversion always takes you the long way round!
Remember those first keyboards they made? They had one major problem. Major chords, fine. When you played a three fingered chord with the left hand you got a major chord playing in the backing. Minor chords, fine. But there was a problem when playing a 7th chord. You would just get that major chord playing in the backing .. not a 7th chord. So play eg. G C E (an inversion of the C chord) and you got G C E sounding in the backing. But add a Bb into the mix so you are playing a C7 chord and all you heard was that G C E again. A 7th chord is such an important chord that just to have a major chord playing again was unacceptable.
So what did they do about it? They made one of the notes a multipurpose note. As all backing part 'patterns' have to be done in the key of C they decided that they would use the note of B as a 'multipurpose note'. This means that the note of B is not a 'proper' note. How it works is like this. You use the note of B in your 'pattern' and their programming plays that note as a C if you are playing a C chord; a B (the note you would expect to be played) if you play a CMaj7 chord; and a Bb if you are playing a C7 chord. So that B is not a 'fixed' note but plays a different note depending on what chord you are playing with your left hand.
What does this mean? It means that when you play a backing PART play the note of B instead of the C in your 'pattern'. Then you will get Major chords, Maj7th chords and 7th chords playing the correct notes in the backing.
End of short diversion ...
So with the above in mind, this means that for our arpeggio the notes we actually play are ...
... or as in Peter's music score ...

.. which looks very much to me like an arpeggio on Em .. which of course it is.
And it sounds like this (and this is what you should play as the arpeggio backing PART):
Click the below to listen; then click the back-button.
The actual arpeggio backing PART you play
In this next DEMO you can hear what the arpeggio actually sounds like when you play with the left hand:
(a) a Major 7th chord (eg. FMaj7) .. followed by
(b) a Major chord (eg. F) .. and
(c) a 7th chord (eg. F7)
Click the below to listen; then click the back-button.
The notes you hear when playing the three chords mentioned above.
You can hear from this that you have made one backing 'pattern' and ended up with multiple arpeggios depending on the chord you play with your left hand. In fact, not only the three chords mentioned above, but you will get a Minor arpeggio if you play a Minor chord; an Augmented arpeggio if you play an Augmented chord; a Diminished arpeggio if you play a Diminished chord etc. And all that from just creating one original 'pattern'. Clever bit of software programming to get all those harmonies out of just a few recorded notes.
Remember those first keyboards they made? They had one major problem. Major chords, fine. When you played a three fingered chord with the left hand you got a major chord playing in the backing. Minor chords, fine. But there was a problem when playing a 7th chord. You would just get that major chord playing in the backing .. not a 7th chord. So play eg. G C E (an inversion of the C chord) and you got G C E sounding in the backing. But add a Bb into the mix so you are playing a C7 chord and all you heard was that G C E again. A 7th chord is such an important chord that just to have a major chord playing again was unacceptable.
So what did they do about it? They made one of the notes a multipurpose note. As all backing part 'patterns' have to be done in the key of C they decided that they would use the note of B as a 'multipurpose note'. This means that the note of B is not a 'proper' note. How it works is like this. You use the note of B in your 'pattern' and their programming plays that note as a C if you are playing a C chord; a B (the note you would expect to be played) if you play a CMaj7 chord; and a Bb if you are playing a C7 chord. So that B is not a 'fixed' note but plays a different note depending on what chord you are playing with your left hand.
What does this mean? It means that when you play a backing PART play the note of B instead of the C in your 'pattern'. Then you will get Major chords, Maj7th chords and 7th chords playing the correct notes in the backing.
End of short diversion ...
So with the above in mind, this means that for our arpeggio the notes we actually play are ...
... or as in Peter's music score ...
.. which looks very much to me like an arpeggio on Em .. which of course it is.
And it sounds like this (and this is what you should play as the arpeggio backing PART):
Click the below to listen; then click the back-button.
The actual arpeggio backing PART you play
In this next DEMO you can hear what the arpeggio actually sounds like when you play with the left hand:
(a) a Major 7th chord (eg. FMaj7) .. followed by
(b) a Major chord (eg. F) .. and
(c) a 7th chord (eg. F7)
Click the below to listen; then click the back-button.
The notes you hear when playing the three chords mentioned above.
You can hear from this that you have made one backing 'pattern' and ended up with multiple arpeggios depending on the chord you play with your left hand. In fact, not only the three chords mentioned above, but you will get a Minor arpeggio if you play a Minor chord; an Augmented arpeggio if you play an Augmented chord; a Diminished arpeggio if you play a Diminished chord etc. And all that from just creating one original 'pattern'. Clever bit of software programming to get all those harmonies out of just a few recorded notes.
It's all about the music ♫ ♪ ♫ Organ: Yamaha AR80 & Keyboard: Tyros 4
..
Challenge Winner
2021 May (Joint Winner); July; September
2022 July; August
2023 April; June; September
.. Challenge Winner
2021 May (Joint Winner); July; September
2022 July; August
2023 April; June; September
-
Hugh-AR - Prolific Poster
- Posts: 7210
- Joined: 07 Feb 2015 15:34
- Location: Weston-super-Mare, Somerset, UK
Re: Analysing a piece of music .. creating Style PARTS.
![]() by Hugh-AR » 14 Jan 2020 20:16
by Hugh-AR » 14 Jan 2020 20:16
What we have so far in creating a 'bespoke' STYLE for What A Wonderful World is a new Bass PART in BASS; and an arpeggio in PHRASE 2. There is a third element I want to hear in this Style, which is a guitar playing a chord on the 'off-beat'. I thought we had something like this in CHORD 2. Nearly! Although there is a guitar playing on the off-beat, on the fourth beat it is intermingled with a few random notes. No matter, you might think. But now we have an arpeggio playing in the backing, those extra notes in CHORD 2 interfere with what our arpeggio is playing, and just cause confusion.
This is what is in the original CHORD 2 slot. Listen to those few sliding notes in the pattern.
Click the below to listen; then click the back-button after to get back to this page.
The 'pattern' of the original CHORD 2 PART
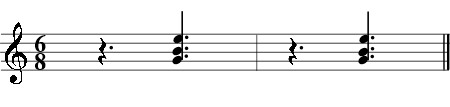
I just want a 'straight' off-beat; so I have DELETED CHORD 2 and keeping the same Voice and Volume I have programmed in a 'straight' off-beat. The notes I have played as a chord are the G above middle C; the B above it; and the E above top C.
Why the B? Well, this is the 'multipurpose' note and we are using that instead of C. You can read about why we do this in my Short Diversion above.
Again, PeterA has written the music score for what I have played, below.
... and you can listen to it here:
Click the below to listen; then click the back-button after to get back to this page.
Straight 'off-beat' in CHORD 2
This is the STYLE we now have for What A Wonderful World. A new BASS Part; an arpeggio in PHRASE 2; and an 'off-beat' guitar chord in CHORD 2 .. we shall do a 'repeating piano' later.
In the DEMO below I am playing just a few chords to show you what the STYLE sounds like so far. And I want to prove to you that the one off 'patterns' we have created do indeed translate into the correct notes based on the chord being played. Very clever that the computer programming does this. I have played the chords F; F+ (ie. F A C#); Bb; Bbm; F; C7; F.
And as you may have realised from listening to what I play, I like to have a 'Voice' allocated to the Lower (left of split) so that a voice 'sounds' along with the STYLE backing part. In this instance I have chosen HORN. So the first half of the DEMO below is the STYLE only; and the second is with my 'Horn' applied as well.
Click the below to listen; then click the back-button after to get back to this page.
DEMO with some chords using the STYLE we have created so far.
That's getting to be something I would want to hear as a backing when playing What A Wonderful World.
This is what is in the original CHORD 2 slot. Listen to those few sliding notes in the pattern.
Click the below to listen; then click the back-button after to get back to this page.
The 'pattern' of the original CHORD 2 PART
I just want a 'straight' off-beat; so I have DELETED CHORD 2 and keeping the same Voice and Volume I have programmed in a 'straight' off-beat. The notes I have played as a chord are the G above middle C; the B above it; and the E above top C.
Why the B? Well, this is the 'multipurpose' note and we are using that instead of C. You can read about why we do this in my Short Diversion above.
Again, PeterA has written the music score for what I have played, below.
... and you can listen to it here:
Click the below to listen; then click the back-button after to get back to this page.
Straight 'off-beat' in CHORD 2
This is the STYLE we now have for What A Wonderful World. A new BASS Part; an arpeggio in PHRASE 2; and an 'off-beat' guitar chord in CHORD 2 .. we shall do a 'repeating piano' later.
In the DEMO below I am playing just a few chords to show you what the STYLE sounds like so far. And I want to prove to you that the one off 'patterns' we have created do indeed translate into the correct notes based on the chord being played. Very clever that the computer programming does this. I have played the chords F; F+ (ie. F A C#); Bb; Bbm; F; C7; F.
And as you may have realised from listening to what I play, I like to have a 'Voice' allocated to the Lower (left of split) so that a voice 'sounds' along with the STYLE backing part. In this instance I have chosen HORN. So the first half of the DEMO below is the STYLE only; and the second is with my 'Horn' applied as well.
Click the below to listen; then click the back-button after to get back to this page.
DEMO with some chords using the STYLE we have created so far.
That's getting to be something I would want to hear as a backing when playing What A Wonderful World.
It's all about the music ♫ ♪ ♫ Organ: Yamaha AR80 & Keyboard: Tyros 4
..
Challenge Winner
2021 May (Joint Winner); July; September
2022 July; August
2023 April; June; September
.. Challenge Winner
2021 May (Joint Winner); July; September
2022 July; August
2023 April; June; September
-
Hugh-AR - Prolific Poster
- Posts: 7210
- Joined: 07 Feb 2015 15:34
- Location: Weston-super-Mare, Somerset, UK
Re: Analysing a piece of music .. creating Style PARTS.
![]() by Hugh-AR » 15 Jan 2020 15:12
by Hugh-AR » 15 Jan 2020 15:12
Here is a summary of what I have done so far.
1. I have listened to Louis Armstrong singing What A Wonderful World on YouTube and noticed two distinct backings his bands are playing. In one, an arpeggio; in the other a 'repeating piano'.
2. I have looked through the default STYLES in the AR for a suitable one to use; have realised that the time signature of the music is 6/8, and only found one 6/8 STYLE in my AR that I could use .. and that is 6/8 Ballad 1 Variation B. This is what the 'default' STYLE sounds like.
Click the below to listen; then click the back-button to get back to this page.
DEMO playing a few chords in the original 6/8 Ballad 1 Variation B STYLE.
This doesn't exactly inspire me to play this tune. I'm not keen on that 'busy' bass line for this song; it has no 'arpeggios' in the backing; and no 'repeating piano'. So I set about changing this Style.
3. I have first made sure that the Style I want to make adjustments to is displayed on the screen; you then press and hold the ACCOMP. PROGRAM button on the right of the screen, whilst at the same time pressing the STYLE tab again. This loads the Style into ACCOMP. PROGRAM ready for you to work on it.
4. In the BASIC screen I changed MAIN A (the ‘default’) to MAIN B. I then went to VOICE and changed the BASS voice from Fingered Bass to Acoustic Bass.
5. Then clicked the button by RECORD. In the BASS slot I DELETED the Bass PART. Then, making sure I had no other 'voices' sounding apart from the Acoustic Bass one, I recorded the new Bass 'pattern'. You do this by pressing the START and watching the TEMPO clock go through a measure (and then it repeats itself). You play your 'pattern' to the end of the 'measure' .. and you must not carry on beyond the measure and play anything on that first beat of the bar when it comes round again on the loop. If you do, you will get a double-whammy on that first beat. The written music I have included is just to get the general idea of what notes to play in the pattern. Ignore that final bar showing in the sheet music. You listen to what you have recorded, and if you are happy with what you hear, press the START again to stop it. If you're not happy, once you've stopped it you'll have to DELETE it all and do it again.
6. Deleted what was in CHORD 2 and replaced it with a guitar playing a straight 'off beat' right through the whole measure.
7. I then set about putting my 'arpeggio' into PHRASE 2. By pressing VOICE I chose a Grand Piano for my arpeggio. Checked the VOLUME and put it up to 21. Next, I DELETED what is in PHRASE 2. Pressed the START and watched the TEMPO clock go round the measure a couple of times while I composed myself to play the arpeggio pattern at the start of the measure. Played my arpeggio .. remembering to use the B note instead of a C. Listened through the loop a few times to make sure it sounded OK, then pressed the START to stop it.
8. I have then gone back to the BASIC screen, and using INPUT NAME (press the appropriate button under the screen) have named it WONDER WORLD.
9. Pressed the SAVE button and 'saved' my Style to eg. USER 1. Gave it a name first using INPUT NAME so I could identify it later. I named this STYLE with the arpeggio Wonder World.
I still haven't done my 'repeating piano' but thought I would do that by replacing the PHRASE 2 in the Sthle I have just done. The idea of having all those various PARTS in a STYLE is so that when building a song up you can have all the PARTS going. Well, I would never want to hear both my arpeggio and repeating piano together, so to avoid that happening I am creating a separate Style that has the repeating piano.
It's all about the music ♫ ♪ ♫ Organ: Yamaha AR80 & Keyboard: Tyros 4
..
Challenge Winner
2021 May (Joint Winner); July; September
2022 July; August
2023 April; June; September
.. Challenge Winner
2021 May (Joint Winner); July; September
2022 July; August
2023 April; June; September
-
Hugh-AR - Prolific Poster
- Posts: 7210
- Joined: 07 Feb 2015 15:34
- Location: Weston-super-Mare, Somerset, UK
Re: Analysing a piece of music .. creating Style PARTS.
![]() by Hugh-AR » 25 Jan 2020 23:14
by Hugh-AR » 25 Jan 2020 23:14
Continuing with my topic on creating PARTS in a STYLE ...
Having created one STYLE with a changed BASS PART; an 'off beat guitar chord' in CHORD 2; and an ARPEGGIO in PHRASE 2; I SAVED that to USER 1 (having given it a name to identify it using INPUT NAME). Once 'saved' to USER 1 it will remain there for me to access it and use it. I can now continue making changes to my Style. BASS and CHORD 2 will remain the same, but I want to replace my 'arpeggio' in PHRASE 2 with a 'repeating piano'. So I now press the button next to RECORD, and by pressing the appropriate buttons under the screen in PHRASE 2 I DELETE the arpeggio I had put in there.
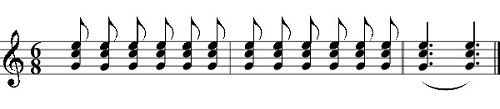
The 'repeating piano' I shall put in there will sound like this:
Click the below to listen; then click the back-button to get back to this page.
The 'repeating piano'
PeterA has done the music score for this, as below:
But of course although this is what we want the final repeating piano to sound like, these are not the actual notes we play in ACCOMP. PROGRAM. We have to remember that the note of B is not a 'proper' note. It is a 'multipurpose' note and we play it instead of C.
So what we actually play is GBE, and the music score for this is below:

So now we move the highlight in PHRASE 2 up to REC; press the START and listen to the measure going round a couple of loops (you can see the loops going round by watching the TEMPO screen), and when you're ready for action record that repeating piano for the whole of the measure, taking care not to play anything when it gets back to 1:1. Listen to what you have recorded as it goes round a couple of loops, and then press the START again to stop it playing (START is an ON/OFF 'toggle switch'). If you're not happy with what you hear, go back up to DEL and delete what you have just done. Try again and see if it's any better.
The difficulty with doing a repeating chord like this is to get your playing 'even' as you play the notes. If you can't get them playing evenly 'on the beat' then there is a way of getting all those notes to play exactly 'on the beat'. Technology again! What I am going to explain now, you can do for any of the PARTS you create .. to get your notes to be exactly 'on the beat' even though you didn't quite manage to do that in the first instance. I could have used this technology for my BASS Part; or for my 'off beat' chord in CHORD 2; or for my arpeggio in PHRASE 2. More often than not I choose not to use this technology because I find that having things exactly on the beat sounds too regimented. But I think that this repeating piano does need to be exactly on the beat for the whole measure.
So I shall now explain how to use another function on the ACCOMP. PROGRAM screen, called EDIT, which is on the right of the screen.
This will be continued in my next post ...
Having created one STYLE with a changed BASS PART; an 'off beat guitar chord' in CHORD 2; and an ARPEGGIO in PHRASE 2; I SAVED that to USER 1 (having given it a name to identify it using INPUT NAME). Once 'saved' to USER 1 it will remain there for me to access it and use it. I can now continue making changes to my Style. BASS and CHORD 2 will remain the same, but I want to replace my 'arpeggio' in PHRASE 2 with a 'repeating piano'. So I now press the button next to RECORD, and by pressing the appropriate buttons under the screen in PHRASE 2 I DELETE the arpeggio I had put in there.
The 'repeating piano' I shall put in there will sound like this:
Click the below to listen; then click the back-button to get back to this page.
The 'repeating piano'
PeterA has done the music score for this, as below:
But of course although this is what we want the final repeating piano to sound like, these are not the actual notes we play in ACCOMP. PROGRAM. We have to remember that the note of B is not a 'proper' note. It is a 'multipurpose' note and we play it instead of C.
So what we actually play is GBE, and the music score for this is below:
So now we move the highlight in PHRASE 2 up to REC; press the START and listen to the measure going round a couple of loops (you can see the loops going round by watching the TEMPO screen), and when you're ready for action record that repeating piano for the whole of the measure, taking care not to play anything when it gets back to 1:1. Listen to what you have recorded as it goes round a couple of loops, and then press the START again to stop it playing (START is an ON/OFF 'toggle switch'). If you're not happy with what you hear, go back up to DEL and delete what you have just done. Try again and see if it's any better.
The difficulty with doing a repeating chord like this is to get your playing 'even' as you play the notes. If you can't get them playing evenly 'on the beat' then there is a way of getting all those notes to play exactly 'on the beat'. Technology again! What I am going to explain now, you can do for any of the PARTS you create .. to get your notes to be exactly 'on the beat' even though you didn't quite manage to do that in the first instance. I could have used this technology for my BASS Part; or for my 'off beat' chord in CHORD 2; or for my arpeggio in PHRASE 2. More often than not I choose not to use this technology because I find that having things exactly on the beat sounds too regimented. But I think that this repeating piano does need to be exactly on the beat for the whole measure.
So I shall now explain how to use another function on the ACCOMP. PROGRAM screen, called EDIT, which is on the right of the screen.
This will be continued in my next post ...
It's all about the music ♫ ♪ ♫ Organ: Yamaha AR80 & Keyboard: Tyros 4
..
Challenge Winner
2021 May (Joint Winner); July; September
2022 July; August
2023 April; June; September
.. Challenge Winner
2021 May (Joint Winner); July; September
2022 July; August
2023 April; June; September
-
Hugh-AR - Prolific Poster
- Posts: 7210
- Joined: 07 Feb 2015 15:34
- Location: Weston-super-Mare, Somerset, UK
Re: Analysing a piece of music .. creating Style PARTS.
![]() by Hugh-AR » 26 Jan 2020 00:36
by Hugh-AR » 26 Jan 2020 00:36
To EDIT a PART you must first have that PART on REC. So as I am working on PHRASE 2, that PART must be on REC.
Press the EDIT button to the right of the screen. This is what you see.
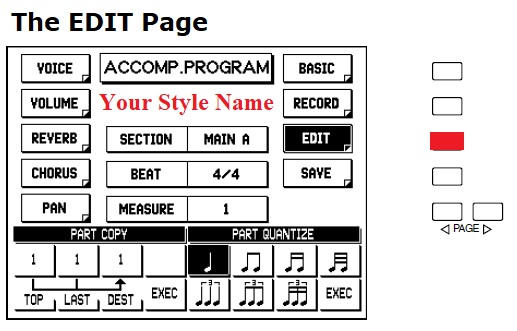
The expression Yamaha use to carry out the process of making sure all those notes you played are exactly 'to the beat' is QUANTIZE. Hence the words PART QUANTIZE in the illustration above ie. 'QUANTIZE the PART' .. the PART that is on REC.
We next have to identlfy the duration of the note from the musical symbols shown. If I was playing a Bass part at 4/4 with four beats to the bar, then I would choose the crotchet (the one highlighted in black in the diagram). If I was playing a Waltz and was playing three notes in a bar I would choose the one just underneath it. But this STYLE is 6/8 time, and I am playing my chords in groups of three semiquavers, so the one to choose in this case is the one indicated below:
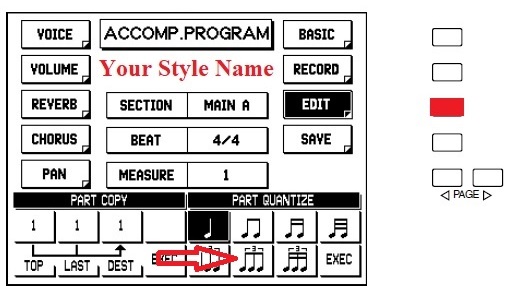
So highlight that one by pressing the appropriate button under the screen .. and then press the button under the screen corresponding to EXEC (execute). You will be asked if you are sure? Confirm with OK.
Now press the START to listen to it. Sound OK? Are all the notes you played now playing exactly to the beat?
Note: If you chose the wrong symbol then the whole thing will be up the spout .. and there is no way back. You'd have to DELETE your PART and go through the whole process of recording it again. And next time choose a different symbol in EDIT! (This statement is made with feeling!)
If this is what you are expecting to hear, then SAVE it eg. to USER 2. Using INPUT NAME I have called this version of my STYLE (with the repeating piano) Wonder Wrld 2. So that's in USER 2.
Press the EDIT button to the right of the screen. This is what you see.
The expression Yamaha use to carry out the process of making sure all those notes you played are exactly 'to the beat' is QUANTIZE. Hence the words PART QUANTIZE in the illustration above ie. 'QUANTIZE the PART' .. the PART that is on REC.
We next have to identlfy the duration of the note from the musical symbols shown. If I was playing a Bass part at 4/4 with four beats to the bar, then I would choose the crotchet (the one highlighted in black in the diagram). If I was playing a Waltz and was playing three notes in a bar I would choose the one just underneath it. But this STYLE is 6/8 time, and I am playing my chords in groups of three semiquavers, so the one to choose in this case is the one indicated below:
So highlight that one by pressing the appropriate button under the screen .. and then press the button under the screen corresponding to EXEC (execute). You will be asked if you are sure? Confirm with OK.
Now press the START to listen to it. Sound OK? Are all the notes you played now playing exactly to the beat?
Note: If you chose the wrong symbol then the whole thing will be up the spout .. and there is no way back. You'd have to DELETE your PART and go through the whole process of recording it again. And next time choose a different symbol in EDIT! (This statement is made with feeling!)
If this is what you are expecting to hear, then SAVE it eg. to USER 2. Using INPUT NAME I have called this version of my STYLE (with the repeating piano) Wonder Wrld 2. So that's in USER 2.
It's all about the music ♫ ♪ ♫ Organ: Yamaha AR80 & Keyboard: Tyros 4
..
Challenge Winner
2021 May (Joint Winner); July; September
2022 July; August
2023 April; June; September
.. Challenge Winner
2021 May (Joint Winner); July; September
2022 July; August
2023 April; June; September
-
Hugh-AR - Prolific Poster
- Posts: 7210
- Joined: 07 Feb 2015 15:34
- Location: Weston-super-Mare, Somerset, UK
Re: Analysing a piece of music .. creating Style PARTS.
![]() by Hugh-AR » 26 Jan 2020 01:14
by Hugh-AR » 26 Jan 2020 01:14
Now press and release the ACCOMP. PROGRAM to come out of it. If you haven't SAVED what you have been doing it will ask you if you really do want to leave the program. Confirm with OK if you don't want to SAVE what you have been doing. If you do, then CANCEL and go back and SAVE it.
Note: If you have saved your work then you won't get this message.
Now we need to find our STYLES so that we can use them.
Press the 1 on the right in the STYLE section. This brings up all the available Styles on the screen. What we are looking for is USER. If USER is showing on the screen, then press the button next to it. If not, you will have to 'scroll' left or right until USER does appear on the screen.
Having got USER showing at the top of the display, we need to press the appropriate button under the screen for the User Number we want. You would press the button under the screen (top row) under USER 1 for the arpeggio; and the button under USER 2 for the 'repeating piano'.
I will press USER 2 and let you hear what our 'repeating piano' sounds like .. particularly as we played a B in our chord. As I said, that B is a 'multipurpose note'. So if you listen to the below you will hear what that chord actually sounds like when I hold down:
(a) .. a Cnat7 chord;
(b) .. a C chord;
(c) .. a C7 chord.
This is the whole point of playing that B in ACCOMP. PROGRAM. You do subsequently get the correct harmony in your backing.
Click the below to listen; then click the back-button to get back to this Page.
What the 'repeating piano'sounds like when playing the chords as above
Now we'll listen to what those two STYLES we created, Wonder World and Wonder Wrld2 sound like when chosen from USER 1 and USER 2. Listen out for the ARPEGGIO, and then the REPEATING PIANO.
Click the below to listen; then click the back-button to get back to this Page.
Using the two Styles Wonder World and Wonder Wrld2
That's more like it! Just the backing I want to hear for playing It's A Wonderful World!
It's all about the music ♫ ♪ ♫ Organ: Yamaha AR80 & Keyboard: Tyros 4
..
Challenge Winner
2021 May (Joint Winner); July; September
2022 July; August
2023 April; June; September
.. Challenge Winner
2021 May (Joint Winner); July; September
2022 July; August
2023 April; June; September
-
Hugh-AR - Prolific Poster
- Posts: 7210
- Joined: 07 Feb 2015 15:34
- Location: Weston-super-Mare, Somerset, UK
Re: Analysing a piece of music .. creating Style PARTS.
![]() by Hugh-AR » 28 Jan 2020 01:49
by Hugh-AR » 28 Jan 2020 01:49
The whole purpose of this exercise was to find/create a suitable STYLE to play What A Wonderful World on the AR organ. The following comment was made by a Roland Atelier AT900 owner, teacher and performer:
All I can say is that as far as the AR is concerned, although the process is difficult to put into words, carrying out something like the above would probably take no more than 5 or 10 minutes. But I agree that you have to know what it is you are setting out to do; and you have to know the ins and outs of ACCOMP. PROGRAM.
I started by finding what 6/8 STYLES I had on the AR, and found two.
By clicking the first LINK below you can hear what these AR backings sound like. The first is the backing only ie. I am playing the chords for the song, but not the melody. Not the whole piece right through, just a DEMO of what it sounds like.
And then in the second I am playing the melody as well. The whole piece right through this time. I said earlier that this 'default' AR STYLE didn't exactly inspire me to play this piece, which is why I wanted to put something together of my own.
Click the below to listen; then click the back-button at the top to get back to this Page
DEMO (Two Verses) of two 'default' AR 6/8 STYLE backings with chords for What A Wonderful World
Click the below to listen; then click the back-button at the top to get back to this Page
What A Wonderful World. The whole song played with the default AR STYLE backings
So yes, I have played the song, and it sounds OK. But I don't find it musically satisfying and wouldn't particularly want to play it again with that backing.
So here is the same as the above, but this time with the STYLE backing I have created.
The first LINK is the STYLE with the correct chords for the song but without the melody. Listen particularly to the bass; the arpeggio; and the 'repeating piano'.
Click the below to listen; then click the back-button at the top to get back to this Page
DEMO (Two Verses) with the arpeggio and 'repeating piano' backings, with the chords for What A Wonderful World .. but no melody line.
And finally, the complete song as I wanted it to sound like.
Click the below to listen; then click the back-button at the top to get back to this Page
What A Wonderful World (MP3) played by Hugh Wallington.
Although this is the end of this venture, I will be putting up another Reply as I have a few examples of how others have tackled and played this song.
Hugh
It's a pain creating new styles. That's true on any instrument.
1) The instrument has to support that feature. Not all do so and some are just plain awkward.
2) You have to have the knowledge and skills to push all the right buttons to get the instrument to do what you want.
3) You have to have the musical skills to arrange every part of the style. That includes writing the actual parts, thinking like each player would.
4) You have to have the keyboard skills to play those parts into the instrument.
5) You then need the skills of the producer, to mix everything properly.
All I can say is that as far as the AR is concerned, although the process is difficult to put into words, carrying out something like the above would probably take no more than 5 or 10 minutes. But I agree that you have to know what it is you are setting out to do; and you have to know the ins and outs of ACCOMP. PROGRAM.
I started by finding what 6/8 STYLES I had on the AR, and found two.
By clicking the first LINK below you can hear what these AR backings sound like. The first is the backing only ie. I am playing the chords for the song, but not the melody. Not the whole piece right through, just a DEMO of what it sounds like.
And then in the second I am playing the melody as well. The whole piece right through this time. I said earlier that this 'default' AR STYLE didn't exactly inspire me to play this piece, which is why I wanted to put something together of my own.
Click the below to listen; then click the back-button at the top to get back to this Page
DEMO (Two Verses) of two 'default' AR 6/8 STYLE backings with chords for What A Wonderful World
Click the below to listen; then click the back-button at the top to get back to this Page
What A Wonderful World. The whole song played with the default AR STYLE backings
So yes, I have played the song, and it sounds OK. But I don't find it musically satisfying and wouldn't particularly want to play it again with that backing.
So here is the same as the above, but this time with the STYLE backing I have created.
The first LINK is the STYLE with the correct chords for the song but without the melody. Listen particularly to the bass; the arpeggio; and the 'repeating piano'.
Click the below to listen; then click the back-button at the top to get back to this Page
DEMO (Two Verses) with the arpeggio and 'repeating piano' backings, with the chords for What A Wonderful World .. but no melody line.
And finally, the complete song as I wanted it to sound like.
Click the below to listen; then click the back-button at the top to get back to this Page
What A Wonderful World (MP3) played by Hugh Wallington.
Although this is the end of this venture, I will be putting up another Reply as I have a few examples of how others have tackled and played this song.
Hugh
It's all about the music ♫ ♪ ♫ Organ: Yamaha AR80 & Keyboard: Tyros 4
..
Challenge Winner
2021 May (Joint Winner); July; September
2022 July; August
2023 April; June; September
.. Challenge Winner
2021 May (Joint Winner); July; September
2022 July; August
2023 April; June; September
-
Hugh-AR - Prolific Poster
- Posts: 7210
- Joined: 07 Feb 2015 15:34
- Location: Weston-super-Mare, Somerset, UK
Re: Analysing a piece of music .. creating Style PARTS.
![]() by Hugh-AR » 30 Jan 2020 11:53
by Hugh-AR » 30 Jan 2020 11:53
I have been looking to see who else has played What A Wonderful World.
Don't listen to all these right the way through at one sitting. If you do, then if you're not fed up with this tune already .. you certainly will be by the time you get to the bottom of the page!
Peter Wood (AR Group) played this piece on his AR100 so I thought that would be interesting to listen to (in case you were wondering, the STYLES on the AR100 and the AR80 are the same). Peter hasn't used a 6/8 Style for this, but instead had used 8 Beat Ballad 2. His version sounds like this.
Click the below to listen; then click the back-button at the top to get back to this page.
Peter Wood playing What A Wonderful World
Jon Davies (JonD) had played this on his Tyros 5, but has played his own 'jazzy' version of this song. So nothing like the original! This is typical of the music Jon plays.
Do a right-click to open this up in a New Tab.
https://app.box.com/s/8zf63nilxfcodnj5apqquss6jonku322
And then here's another version played by BrianD (Papadeedee), playing Hammond on his EL70. Played as an organ should be played .. no STYLE. Just some drums to accompany him.
Do a right-click to open this up in a New Tab.
https://app.box.com/s/657u0ffp5stccpvwy8zx2mmgtrp6zc0v
This next one is George Turner (George) playing his Genos keyboard. This one is in 6/8 time.
Do a right-click to open this up in a New Tab.
https://app.box.com/s/psd96xr80e7j6psqj10aka04m09kfu41
One here by Fred Turner (dragon) playing his Lowrey Rialto organ.
And Den (dentyr) playing this on a Tyros 4. This one is in 6/8 time.
Do a right-click to open this up in a New Tab.
https://app.box.com/s/nscj4dbp04pjqwrxl0x8m5fmv5nd8ch0
Then here's Pamela White (pamela) playing this on a Tyros 5.
Do a right-click to open this up in a New Tab.
https://app.box.com/s/ww51zgwpq51mqlkhnzay
Finally, here is a version played on the Tyros 4, as a 'vocal', starring PaulaD from TDP!
Well, I did listen to them all at one sitting (had to to make sure everything worked as it should!) and they were all so different! Enjoyed listening to them and wasn't fed up with the song at all. I was particularly impressed by Paula D's video, which was put together by her husband.
Hugh
It's all about the music ♫ ♪ ♫ Organ: Yamaha AR80 & Keyboard: Tyros 4
..
Challenge Winner
2021 May (Joint Winner); July; September
2022 July; August
2023 April; June; September
.. Challenge Winner
2021 May (Joint Winner); July; September
2022 July; August
2023 April; June; September
-
Hugh-AR - Prolific Poster
- Posts: 7210
- Joined: 07 Feb 2015 15:34
- Location: Weston-super-Mare, Somerset, UK
16 posts
• Page 1 of 1
Who is online
Users browsing this forum: No registered users and 0 guests